How To Use Ubuntu Ocelot Oneiric 11:10
Be the fifteenth release of the Ubuntu operating system, Ubuntu 11:10 have stout changes from its predecessor, the main sector of the GUI and application packages are included.
Elimination as a Synaptic package manager because its function is replaced by the Ubuntu Software Center also feels quite confusing for novice users. Necessary adjustment of old habits with new functions that exist. Recognizing this, we will present a tutorial that will guide the novice user to make adjustments to not abandon old habits, but also still encourage users to begin to be familiar with new functions in Ubuntu 11:10. no exception to the user who first uses the operating system Ubuntu , we hope this tutorial can guide you comfortably migrate from the old system to new system that you know this. Therefore, to consider the ease, giving priority to the use of graphical database of choice, with the hope it will be easier to understand and follow. This tutorial describes what steps you need to lalukan after successfully installing Ubuntu 11:10 . Although not something to be done, but we hope will make it easy for us to operate properly Ubuntu 11:10 the previous version we are familiar enough. Step One , featuring a hidden grub menu. On the use of Ubuntu as a single system, grub menu is never shown as computer is turned on. This differs from the use of the dual boot system, whereby a computer planted in two different operating systems, Ubuntu and Windows 7 11:10 for example, the grub menu will always appear to want to run the user can choose which operating system. What is the importance of the system displays the grub menu single?. It was the custom for a beginner to keep trying, follow the guidelines that he read and practiced on the system it uses. There are times when, instead of a success is obtained, but a dark screen, login fails or other error messages are encountered. Panic and upset, maybe it is felt, and what can be done?, The system has been corrupted leaving only a dark screen only. The response is most likely to do is to reinstall the system or become discouraged and choose the old operating system that feels much easier and friendly ... :) When that condition occurs, there's the time to be a very significant group menu.Instead of reinstalling the system, would not it be better and wiser if we choose to fix it?. Grub menu will provide a way for you to get into the system with Recovery Mode, this is the importance of .. :) To show the grub menu is hidden, please follow these guidelines. Open Dash home and type in " terminal "without quotes to run the Terminal. In the terminal window that opens type the following command and press enter ... sudo gedit / etc / default / grub ... enter your password if prompted. Grub will be opened with gedit, please locate and change only the following line ... GRUB_HIDDEN_TIMEOUT = 0 ... insert a hash mark (#) in front of the line so that it becomes ... # GRUB_HIDDEN_TIMEOUT = 0

... Save your changes and close the gedit window. Still with an open terminal, type the following command and press enter to update the grub ... sudo update-grub2

... Please wait until the update process is complete grub and close the terminal window. Please reboot the computer. Now the grub menu will always be displayed when the computer is turned on even though we only use a single system.

The second step , installing the Synaptic package manager.
Make sure you are connected to the internet. Run back to the terminal as the above steps and type the following command ... sudo apt-get install synaptic ... press enter, enter the password when prompted. When you are prompted, answer all the mengetk " y "without the quotes to approve funding to continue the installation process is complete.
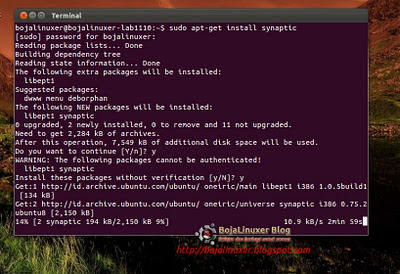
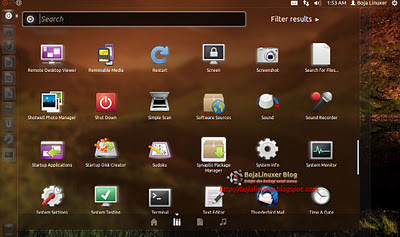
Please check through the Dash home, Synaptic package has been successfully installed ...
The third step , installing the package GDebi.
this simple package we can use to install the file *. deb with graphics mode. Run Synaptic you just installed and type " GDebi "in the search box. Mark the package to be installed GDebi ...

Examples of its use is, if you have a deb package in the form of files, right click on the deb file you want to install and select menu " Open With GDebi Package Installer "rest of us just follow the instructions displayed to install and it's very easy ...

The fourth step , install CompizConfig-settings-manager.
package will be very useful to manage the 3D effects that will apply on the desktop. Run Synaptic and type " CompizConfig-settings-manager "in the search box. Mark the package CompizConfig-settings-manager to be installed ...

Run the package you just installed it, then start to adjust the 3D effects that you like ...

The fifth step , installing the Classic menu indicator.
The most troublesome when using a desktop Unity is we have always run the Dash home to find applications that will be run, it was no easier than when using the Gnome desktop classic. By installing the Classic package menu indicator then we will have a classic menu on the Gnome desktop Unity. To install the Classic menu indicator, download the debian package from this site . By using GDebi please install the Classic menu indicator. Installation is complete reboot the computer, the classic Gnome menu has been there on your desktop Unity ...

The sixth step , install the Gnome-tweak-tool.
Without this package installed on your system, you may have trouble organizing and changing desktop view. Gnome tweak tool is used to replace existing functionality in Gnome Appearance 2 on Gnome 3. With Gnome tweak, change themes, icons, cursors and other desktop settings will be easier. As the above steps, install the gnome-tweak-tool using synaptic ...

Gnome tweak tool you can run by selecting the shortcut " Advenced Settings"either from home or from the menu Dash classic ...

With the installation of some additional packages, 11:10 Ubuntu adjustments that have been using the Gnome desktop environment 3 will be easier because it will not bebeda away with the desktop environment used on the previous system.Good luck

If a previous version of Ubuntu still providing classic Gnome interface as an option in addition to Unity which has become the default GUI from Ubuntu 11.04. On this latest release, Gnome Classic is no longer included by default in Ubuntu 11:10. Unity has been a session default to Ubuntu and Gnome Unity replaces classic 2d session as an option when the graphics device being used and not cloudy or OpenGL graphics driver is not installed, so Ubuntu does not recognize it.
Elimination as a Synaptic package manager because its function is replaced by the Ubuntu Software Center also feels quite confusing for novice users. Necessary adjustment of old habits with new functions that exist. Recognizing this, we will present a tutorial that will guide the novice user to make adjustments to not abandon old habits, but also still encourage users to begin to be familiar with new functions in Ubuntu 11:10. no exception to the user who first uses the operating system Ubuntu , we hope this tutorial can guide you comfortably migrate from the old system to new system that you know this. Therefore, to consider the ease, giving priority to the use of graphical database of choice, with the hope it will be easier to understand and follow. This tutorial describes what steps you need to lalukan after successfully installing Ubuntu 11:10 . Although not something to be done, but we hope will make it easy for us to operate properly Ubuntu 11:10 the previous version we are familiar enough. Step One , featuring a hidden grub menu. On the use of Ubuntu as a single system, grub menu is never shown as computer is turned on. This differs from the use of the dual boot system, whereby a computer planted in two different operating systems, Ubuntu and Windows 7 11:10 for example, the grub menu will always appear to want to run the user can choose which operating system. What is the importance of the system displays the grub menu single?. It was the custom for a beginner to keep trying, follow the guidelines that he read and practiced on the system it uses. There are times when, instead of a success is obtained, but a dark screen, login fails or other error messages are encountered. Panic and upset, maybe it is felt, and what can be done?, The system has been corrupted leaving only a dark screen only. The response is most likely to do is to reinstall the system or become discouraged and choose the old operating system that feels much easier and friendly ... :) When that condition occurs, there's the time to be a very significant group menu.Instead of reinstalling the system, would not it be better and wiser if we choose to fix it?. Grub menu will provide a way for you to get into the system with Recovery Mode, this is the importance of .. :) To show the grub menu is hidden, please follow these guidelines. Open Dash home and type in " terminal "without quotes to run the Terminal. In the terminal window that opens type the following command and press enter ... sudo gedit / etc / default / grub ... enter your password if prompted. Grub will be opened with gedit, please locate and change only the following line ... GRUB_HIDDEN_TIMEOUT = 0 ... insert a hash mark (#) in front of the line so that it becomes ... # GRUB_HIDDEN_TIMEOUT = 0

... Save your changes and close the gedit window. Still with an open terminal, type the following command and press enter to update the grub ... sudo update-grub2

... Please wait until the update process is complete grub and close the terminal window. Please reboot the computer. Now the grub menu will always be displayed when the computer is turned on even though we only use a single system.

The second step , installing the Synaptic package manager.
Make sure you are connected to the internet. Run back to the terminal as the above steps and type the following command ... sudo apt-get install synaptic ... press enter, enter the password when prompted. When you are prompted, answer all the mengetk " y "without the quotes to approve funding to continue the installation process is complete.

Please check through the Dash home, Synaptic package has been successfully installed ...

The third step , installing the package GDebi.
this simple package we can use to install the file *. deb with graphics mode. Run Synaptic you just installed and type " GDebi "in the search box. Mark the package to be installed GDebi ...

Examples of its use is, if you have a deb package in the form of files, right click on the deb file you want to install and select menu " Open With GDebi Package Installer "rest of us just follow the instructions displayed to install and it's very easy ...

The fourth step , install CompizConfig-settings-manager.
package will be very useful to manage the 3D effects that will apply on the desktop. Run Synaptic and type " CompizConfig-settings-manager "in the search box. Mark the package CompizConfig-settings-manager to be installed ...

Run the package you just installed it, then start to adjust the 3D effects that you like ...

The fifth step , installing the Classic menu indicator.
The most troublesome when using a desktop Unity is we have always run the Dash home to find applications that will be run, it was no easier than when using the Gnome desktop classic. By installing the Classic package menu indicator then we will have a classic menu on the Gnome desktop Unity. To install the Classic menu indicator, download the debian package from this site . By using GDebi please install the Classic menu indicator. Installation is complete reboot the computer, the classic Gnome menu has been there on your desktop Unity ...

The sixth step , install the Gnome-tweak-tool.
Without this package installed on your system, you may have trouble organizing and changing desktop view. Gnome tweak tool is used to replace existing functionality in Gnome Appearance 2 on Gnome 3. With Gnome tweak, change themes, icons, cursors and other desktop settings will be easier. As the above steps, install the gnome-tweak-tool using synaptic ...

Gnome tweak tool you can run by selecting the shortcut " Advenced Settings"either from home or from the menu Dash classic ...

With the installation of some additional packages, 11:10 Ubuntu adjustments that have been using the Gnome desktop environment 3 will be easier because it will not bebeda away with the desktop environment used on the previous system.Good luck
SOURCE


0 komentar:
Post a Comment